How To Install Resilient Sound Isolation Clips
Installation Video for GenieClip RST
Specified Fasteners
Wood: #8 x 2-1/2″ coarse thread wood or drywall screw
Steel: #8, #10, or #12 x 1-5/8″ self tapping, fine thread, Type-S
Concrete: 3/16″ or 1/4″ x 2-1/4″ anchor screw (Tapcon)
Splicing Channel: 1/2″ pan head steel stud framing screw or similar
Use fasteners that will have a minimum of 120 lbs pull out or shear strength in the wood, steel, or concrete substrate. Tighten the fastener until it comes in to solid contact with the top washer on the GenieClip® RST. For best acoustic results, do not over tighten.
Choose A Layout Pattern (Same For Walls and Ceilings)
-

Standard Layout
Following a standard layout pattern is the quickest, simplest, and lowest priced way to install resilient channel clips.
For both ceilings and walls, the perimeter will have a clip installed within 6″ of the adjacent surface. For walls we suggest a row of clips within 3″ of the floor to allow for baseboard to be installed and increase stability. The rows of clips should be a maximum of 24″ on center for single or double layer drywall and 16″ on center for triple layer drywall.
Regardless of the span between, each clip should be no more than 48″ apart.
-
Staggered Layout
The staggered layout pattern is slightly more complicated and about 10% more clips will be used. However, all lab tests conducted with resilient clips use the staggered layout and field tests have shown as much as a 5dB loss improvement in some frequencies. Another advantage is the weight distribution by dividing the clips evenly on the framing. This is preferred in older ceilings or in ceilings with shallow joists.
For both ceilings and walls, the perimeter will have a clip installed within 6″ of the adjacent surface. For walls we suggest a row of clips within 3″ of the floor to attach baseboard trim and increase stability. The rows of clips should be a maximum of 24″ on center for single or double layer drywall and 16″ on center for triple layer drywall.
The clips in the first row will be spaced 48″ on center from the first perimeter stud. The next clip for each subsequent row will shift 16″ to the left of the previous row.
Ceiling and Wall Assembly
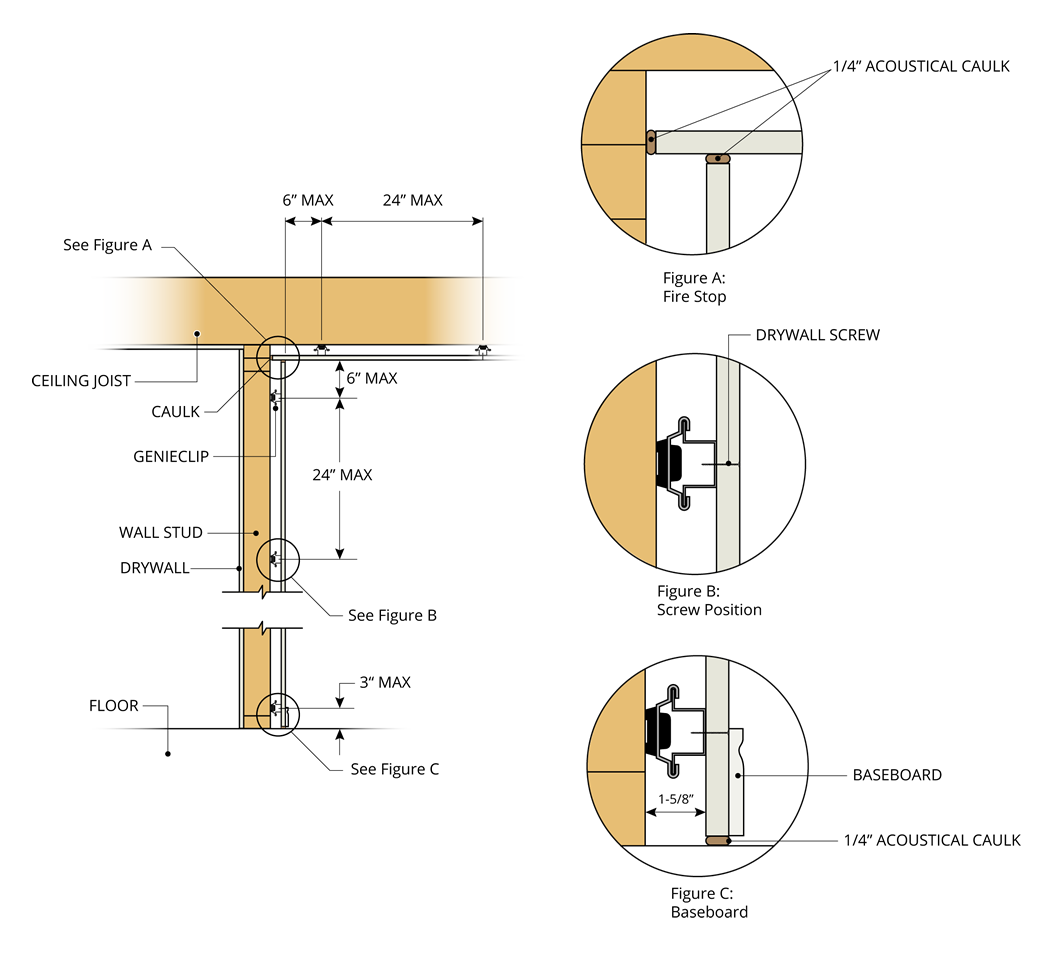
| Figure A:We recommend installing the sound isolation clips for drywall on the ceiling before beginning any work to the wall. After installing the ceiling drywall, you will caulk the gap between the ceiling drywall and the wall framing. This will reduce sound transfer and create a fire stop which will limit flame spread behind your wall to the floor above. | Figure B:The screws used to fasten the drywall should only enter the furring hat channel. The length of the drywall screw should not penetrate the resilient clip or framing. If you do come in contact with the clip, then the strength of the clip will keep the screw from penetrating the clip. | Figure C:The bottom row of clips should be installed within 3″ of the finished floor to attach baseboard and increase stability. The baseboard can be nailed into the furring hat channel. Applying a thin bead of adhesive or caulk to the back of the baseboard before attaching the baseboard will help increase the hold strength of the finish nail. The remaining gap beneath the drywall should be caulked with an acoustical caulk. |
Dealing With Common Obstacles
-
Doors and Windows
Furring hat channel should terminate flush with the framed opening of each door and window. A header comprised of two hat channel clips and a short piece of channel should be installed above each door and window, with a footer installed below each window. If the window or door exceeds 4′ in width then extra clips will be required for the header and footer.
-
Vents and Openings
Furring hat channel cannot be installed over any vent or opening in your wall or ceiling. The lost connection of furring hat channel will need to be substituted with a short piece installed to either side of the opening. This will increase stability around the opening.
-
Perimeter Backing
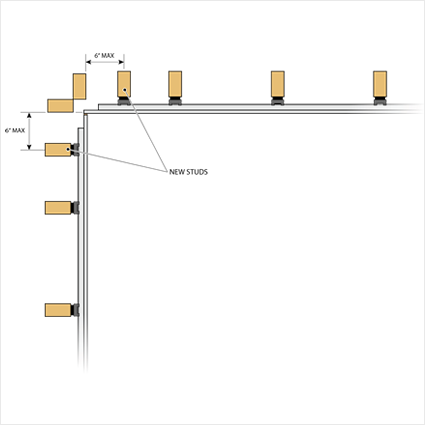
As noted above, resilient sound isolation clips must be installed within 6″ of the perimeter of each wall and ceiling. It is not uncommon for clip installers to have to add a stud or other framing member to meet this requirement. Keeping the perimeter clips within 6″ of each wall and ceiling will increase stability for the installation of drywall.
-
Extending Electrical
A simple way to extend an outlet box to become flush with the drywall is to use a 2×4 block attached to the side of the framing. This block should not come in contact with the drywall, clips, or channel. The outlet box is then attached to the block at a distance that will allow the box to become flush with the surface of the drywall. An additional box extension ring can be used if several layers of drywall are installed.
Installing the Furring Hat Channel
Resilient channel installation of the furring hat channel into the resilient sound isolation clip does not require any fasteners. Start by inserting the furring hat channel into one side of the clip. Then, using your hands, compress the other side of the furring hat channel to squeeze the channel in place so that both sides of the channel are locked into the resilient sound isolation clip. The furring hat channel will remain in place regardless of the weight of the drywall installed on the channel. The gauge of channel preferred is 25 gauge for both resiliency and ease of the hat channel installation. Furring hat channel is typically easy to find locally from drywall distributors or building supply stores, but can also be purchased online from our store in lengths of 6′. Click here to purchase hat channel from our site.
Splicing the Furring Hat Channel
You will need to splice two pieces of furring hat channel together when the length of the channel cannot span the entire wall or ceiling. The two pieces of channel that you splice together will need to overlap by a minimum of 6″. This splice needs to occur between two clips because the clips are not designed to hold two pieces of channel. No additional drywall clips are needed near the splice. Fasten a pan head steel stud framing screw on both sides of the channel to provide a stable splice between each piece of channel.
Drywall Installation
We recommend installing the drywall perpendicular to the furring hat channel. When installing drywall on a ceiling or wall, maintain up to a 1/4″ gap along the perimeter. This reduces flanking to adjacent walls, ceilings, and the floor. Use temporary 1/4″ or thinner shims along the floor and only remove the shims once all the screws are in place. Any gap that remains will need to be caulked with GG Acoustical Sealant or similar to eliminate sound transfer through the gap and to provide a flexible connection between the adjacent walls.
Important Reminders and Tips
- The distance between clips should not exceed 48 inches on center.
- Center the clip on the framing and fasten only enough that the clip has a slight ability to turn. Set the clutch after the first clip.
- Hat channel row spacing should not exceed 24 inches on center and generally should run perpendicular to the joists or studs unless the installation is recessed into the framing cavity.
- You must seal the wall after you install the drywall to ensure the sound isolation integrity of your assembly. Use a product like GG Acoustical Sealant to seal the 1/8″-1/4″ gap along the entire perimeter, as well as any electrical outlets or openings. If you are finishing your wall with a standard finish (i.e. paint, texture, wallpaper, tile, or similar), there is no need to caulk any non-perimeter drywall joints. Simply tape and mud them as normal. If you are finishing your wall in a non-conventional covering that does not require taping/mudding (i.e. fabric, acoustic panel, foam, or similar), then you must also caulk the drywall joints.
- Mount each clip using the appropriate fasteners specified above. These can be purchased from any hardware store.
- We recommend using a chalk line to layout clips quicker and more accurately. Another option is to mark the appropriate clip spacing on the side of a piece of channel. Set the channel next to the stud that will receive clips and use the markings on the channel as a simple guide to show the distance in which each clip will be installed on that stud.